How to use an Ignition Coil
I have had second thoughts about adding this page to my website, questioning wether its such a good idea to encourage people to build their own cannons. However, seeing the dangerous methods of ignition that people use, I figure its in the interest of safety for people to use a proper ignition system and trigger their cannons from a safe distance.
Operating principles
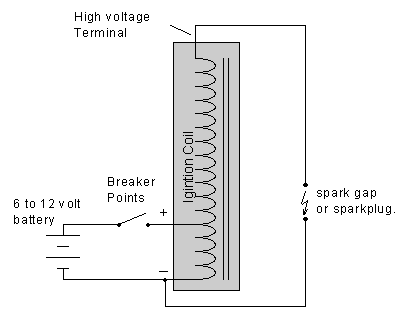
An ignition coil is essentially an autotransformer with a high ratio of secondary to primary windings. By "Autotransformer", I mean that the primary and secondary windings are not actually separated - they share a few of the windings. The ratio of secondary to primary turns in an ignition coil is somewhere around 100:1. The ignition coil is operated directly off a 12 volt source. However, the ignition coil does not work like an ordinary transformer. An ordinary transformer will produce output current at the same time that input current is applied. An ignition coil actually does most of its work acting as an inductor. When the ignition coil is connected to the battery, the inductor is 'charged' with current. It takes a few milliseconds for the current to build up the magnetic field - this on account of reverse voltage caused by the increase in magnetic field. During this short charging period, maybe a thousand volts are produced at the high voltage terminal, not enough to actually cause a spark.
The actual spark is generated when the breaker contacts open. For an ideal inductor, the current and voltage relate by:
V = L dI Where V is voltage, L is inductance (in henrys) and dI is the rate of change of the current.
Thus, seeing that L is constant for the inductor, the abrupt change in current will cause a very large voltage to be produced. This produces a very short, very high voltage spike. Of course, the change in current is on the primary side, but because the primary and secondary coils have a large mutual inductance (this is where the transformer part comes in), you get a spike on the order of 100 or more volts on the primary, and 10000 volts on the secondary. Even the primary side of the coil can give you a bit of a jolt if you hold the wires wile disconnecting power. Also note that any contacts you will use will get a lot of sparks, also on account of this. A less theoretical way of looking at it is that disconnecting the current source will cause the magnetic field in the coil to collapse (because nothing is forcing it magnetic anymore), and the rapid change of magnetic field in turn induces a large voltage in the windings.
In an engine with four or more cylinders, the high voltage terminal of the coil is connected to the distributor, which is just a fancy high voltage rotating switch, for selecting which of the spark plugs needs to be fired. This is much cheaper than having one ignition coil for each cylinder.
Modern cars of course all use electronic ignitions instead of the unreliable mechanical breaker points points for interrupting the current to the ignition coil. However, the ignition coil still works the same way, so you should be able to use an ignition coil even from a modern car. The main thing that has changed is that the 'points' have been replaced with fancy computer gadgetry and power electronics.
One thing that cars usually have that I didn't include in the circuit is a small capacitor across the breaker points, often called the "ignitor". This capacitor in cars before electronic ignition had a tendency to fail over time, so you may have heard people refer to it. The capacitor helps to protect the points by liming voltage across the contacts, so the contacts themselves won't spark. It also forms a bit of a resonant circuit with the coil, and that way enhances the spark, although it probably cuts down on the output voltage a little bit. For the purpose of firing a cannon, it works well enough without one.
Using an ignition coil
Using an ignition coil is fairly straightforward. Connecting 8 AA batteries in series provides more than enough current and voltage. The AA batteries should last for a lot of firings, so you might as well connect the batteries together by soldering wires onto them. Even a 9 volt alkaline battery is sufficient to produce sparks with an ignition coil. Connect the high voltage terminal of your ignition coil to the tip of the spark plug. The high voltage terminal is at the top center of the coil, with the deep socket. Use wire with good insulation - use at least the kind of cable used in a power cord, or something with thicker insulation. Its best to keep the wires a few centimeters apart, and away from any moisture. High voltage will find its way through any defects in the insulation. Keep the wires less than a meter long. Use another wire to connect the body of the spark plug to one of the terminals of the ignition coil (doesn't matter which one).
Next run two wires from the positive and negative terminals of the ignition coil. If you can't tell which is which, don't worry, swapping positive and negative won't make much difference. I recommend you use a long, but fairly thick wire for this, so that you can trigger your cannon from a safe distance. Your ears will thank you.
Connect the negative one to the battery. Then take the positive wire, and quickly swipe it over the other battery terminal. You should see and hear sparks at the ignition coil as you do this. Be sure to hold the wire you are swiping on the battery by just the insulation. If you do end up holding the conductor, and the batteries with the other hand, you will get a bit of an electrical jolt as you do this - though not enough to be dangerous. A pair of screws screwed through the ABS pipe can be used instead of a spark plug. However, I found on my cannon that after just a couple of firings, there was enough moisture buildup in the cannon to prevent this arrangement from sparking. The moisture comes from the water vapour, which, along with carbon dioxide, is a product of the combustion. A proper spark plug will not short out as easily. To mount the plug, just drill a hole slightly smaller than the outside thread of the spark plug, and then screw the plug into the unthreaded hole in the ABS pipe. It should hold quite well that way. But even with a spark plug, moisture buildup from repeated firings can short out the plug. I recommend blowing fresh air through the cannon between shots.
Danger? What Danger?
Even though an ignition coil will produce about 10,000 volts, it actually less dangerous than the 110 volt that comes out of a wall socket. This because the ignition coil does not produce enough current to do a lot of harm. Also, the ignition coil will only produce high output voltages in transients on the input current. So if you are just firing it by stroking the wires across the battery terminals, you only get short bursts of voltage, not the continuous electricity coming out of a wall socket. So if safety is your concern, the safety that is to be gained by being able to fire your cannon from a safe distance outweighs the perceived danger of the high voltage.
Oil furnace ignition coils
Oil furnace ignition coils are very different from automotive ignition coils. They are typically about 10x15x15 cm rectangular, weighing 5 kg or more. They have two high voltage terminals instead of one, and take 120 volt power directly from the wall. Those things are seriously dangerous. The voltage from those things can definitely kill you if you are unfortunate enough to get zapped by it. I don't recommend their use for this sort of purpose. They need a lot of AC power and cannot be operated from batteries.
Besides the fact that this setup is extremely easy to make, its also quite cheap because there are only three main components. Due to the fact that it runs off Mains 120V AC, it can be extremely dangerous. The capacitor (s) included can store a huge amount of electricity so always remember to discharge it (them) after use or to perform maintenance. On the right, you can see my final setup. If run from a true car battery, the final HV output is a lot higher if run from a car battery, but running it off the mains is a lot more portable . There is some arcing over from the HV output to the ground. i I think the only solution would be to immerse the whole thin in oil, but doing that is sort of messy, so I'll have to build some better insulation. Below is a slap-together diagram of my setup:
Not many circuits get any simpler than this, although now your wondering...how does it work? T. The dimmer switch contains a "device" titled a triac. A triac is an electronic switch which triggers in sync with the mains frequency. The potentiometer on the light dimmer adjusts the timing of the triggering. As the triac triggers, it closes the circuit consisting of the coil primary, the capacitors and the AC mains. The following happens in order. The capacitors discharge into the ignition coil, then recharge again from the mains through the ignition coil, to the opposite polarity. Once the capacitor is charged, the current drops to zero which makes the triac to turn off. During the brief period when the triac is off, the line voltage goes through zero and builds up in the opposite direction. When the light dimmer knob is set correctly to about fifty percent, the triac fires at the exact time the line reaches its peak voltage in the opposite direction, so the coil gets slammed with the full line voltage, plus the full voltage of the capacitor. The ignition coil gets hit with both voltages in series. Then this whole process is repeated over and over (about 90-120 times a second).
Not many circuits get any simpler than this, although now your wondering...how does it work? T. The dimmer switch contains a "device" titled a triac. A triac is an electronic switch which triggers in sync with the mains frequency. The potentiometer on the light dimmer adjusts the timing of the triggering. As the triac triggers, it closes the circuit consisting of the coil primary, the capacitors and the AC mains. The following happens in order. The capacitors discharge into the ignition coil, then recharge again from the mains through the ignition coil, to the opposite polarity. Once the capacitor is charged, the current drops to zero which makes the triac to turn off. During the brief period when the triac is off, the line voltage goes through zero and builds up in the opposite direction. When the light dimmer knob is set correctly to about fifty percent, the triac fires at the exact time the line reaches its peak voltage in the opposite direction, so the coil gets slammed with the full line voltage, plus the full voltage of the capacitor. The ignition coil gets hit with both voltages in series. Then this whole process is repeated over and over (about 90-120 times a second).